Tuesday, September 8, 2026

Connection pooling in depth


Who Decides How Many Node.js Instances and Database Connections You Need?

When we learn Node.js connection pooling, we often see something simple like:

const pool = new Pool({
max: 20
});

But this immediately raises a more important question:

Why 20?

And once your application runs multiple instances, another question appears:

If one instance has 20 database connections, what happens when I have 10 instances?

Now you're potentially talking about:

10 instances × 20 connections  =  200 database connections

So who decides all of this?

Is there an algorithm?

The short answer is:

There isn't one algorithm responsible for the entire system. Different layers make different decisions.

Let's break down the system.


1. First Understand the Architecture

A typical production Node.js backend looks something like this:

                    Internet
                       │
                       ▼
                ┌─────────────┐
                │Load Balancer│
                └──────┬──────┘
                       │
             ┌─────────┼─────────┐
             ▼         ▼         ▼
          Node.js   Node.js   Node.js
          Instance  Instance  Instance
             │         │         │
           Pool      Pool      Pool
             │         │         │
             └─────────┼─────────┘
                       ▼
                    Database

There are several independent decisions happening here.

  • The load balancer decides where requests go.

  • The autoscaler can decide how many application instances should run.

  • The connection pool manages database connections inside each instance.

  • Engineers decide the pool configuration and database capacity based on constraints and measurements.

Let's look at each one.


2. Who Decides How Many Application Instances Run?

An application instance is simply one running copy of your Node.js application.

For example:

Node.js Application
├── Express
├── Business Logic
├── API Routes
└── DB Connection Pool

That's one instance.

If you run three copies:

Node.js #1
Node.js #2
Node.js #3

you have three application instances.

In production, we generally don't manually watch traffic and start servers ourselves.

We use an autoscaling mechanism.

For example, Kubernetes provides the Horizontal Pod Autoscaler (HPA).

You might configure something like:

Minimum instances = 2
Maximum instances = 10
Target CPU        = 60%

The autoscaler observes metrics and adjusts the number of replicas.

For example:

Low traffic
2 instances
│ traffic increases
CPU / latency increases
Autoscaler
4 instances

Later:

Traffic decreases
Lower resource utilization
Autoscaler
2 instances

So:

The autoscaler decides the desired number of application instances based on configured policies and metrics.


3. Who Decides Which Instance Gets the Request?

That's the job of the load balancer.

Suppose we have:

Instance A
Instance B
Instance C

Incoming requests need to be distributed among them.

A simple algorithm is round robin:

Request 1 → A
Request 2 → B
Request 3 → C
Request 4 → A
Request 5 → B
Request 6 → C

Other strategies include:

  • least connections

  • weighted routing

  • latency-based routing

  • health-aware routing

The load balancer also performs health checks.

If Instance B is unhealthy:

          Load Balancer
          /           \
         ↓             ↓
    Instance A     Instance C

              X
         Instance B
        unhealthy

The load balancer can stop sending traffic to it.

So:

The load balancer decides where each incoming request should go.


4. Now We Reach Connection Pooling

Once a request reaches a Node.js instance, it needs to talk to the database.

Instead of creating a new database connection for every request, the application uses a connection pool.

For example:

const pool = new Pool({
  max: 15
});

The pool might contain:

Connection 1
Connection 2
Connection 3
...
Connection 15

A request borrows an available connection:

Request
   │
   ▼
Connection Pool
   │
   ├── Connection 1 → busy
   ├── Connection 2 → available
   ├── Connection 3 → busy
   └── ...

After the query finishes, the connection becomes available again.

The important thing is:

The pool is normally created once per application instance, not once per request.


5. But Who Decides pool.max?

This is where things get interesting.

The connection pool does not magically know the perfect value.

If you write:

max: 20

you are telling the pool:

"This instance can have at most 20 connections."

But you need to determine whether 20 is actually appropriate.

And the first thing you need to know is:

How many application instances can exist?


6. The Connection Multiplication Problem

Imagine:

Maximum application instances = 10

Pool max per instance = 20

Potential database connections:

10 × 20 = 200

This is the number you need to think about.

Not: pool.max = 20

but: total possible connections instances × pool size

This is one of the most important concepts in production connection pooling.


7. Database Capacity Is the Constraint

Suppose your database allows:

Maximum DB connections = 200

But other applications and administrative workloads need some of those connections.

You decide to reserve:

50 connections

That leaves:

200 - 50 = 150

for your Node.js application.

Suppose your application can scale to:

10 instances

Then a starting calculation is:

150 / 10 = 15

So you could configure:

const pool = new Pool({
  max: 15
});

Now the theoretical maximum is:

10 instances × 15 connections = 150 connections

which fits within the application's connection budget.

This isn't a magic formula that guarantees optimal performance.

It's a capacity constraint that gives you a safe starting point.

You then validate it with load testing and production metrics.


8. What Happens If the Pool Is Full?

Suppose:

Pool size = 10

and all ten connections are busy.

Then another request arrives.

There is no immediately available connection.

Depending on the database driver/pool implementation, the request waits for a connection or eventually times out.

Conceptually:

Connection 1 → busy
Connection 2 → busy
Connection 3 → busy
...
Connection 10 → busy

Request 11
Waiting for connection

If this keeps happening:

Pool exhausted
Requests wait
Latency increases
Timeouts
Errors

But here's an important engineering lesson:

Don't automatically solve pool exhaustion by increasing the pool size.

Why?

Because the database might already be the bottleneck.


9. The Real Root Cause Could Be Slow Queries

Suppose each database query normally takes: 50 ms

A connection is occupied for roughly 50 ms.

Now imagine a bad query causes execution time to increase to: 5 seconds

The same connection is now occupied for much longer.

So your 15 connections might become: 15 busy connections many waiting requests

The problem isn't necessarily that your pool is too small.

The problem may be:

Slow query
Connection stays occupied
Pool becomes exhausted
Requests wait

The fix might be:

  • add the correct index

  • optimize the SQL

  • eliminate N+1 queries

  • reduce unnecessary database calls

  • improve transaction boundaries

  • cache frequently accessed data


10. Transactions Make Connection Usage Even More Important

Transactions need to stay on the same database connection.


This is critical.

If you acquire a connection manually, you need to make sure it gets returned to the pool.

Otherwise you can create a connection leak.


11. Connection Leaks Can Exhaust the Pool

Imagine:

Pool = 10 connections

If code repeatedly does:

const client = await pool.connect();

// use client

// forgot client.release()

connections can remain checked out.

Eventually:

Connection 1 → leaked
Connection 2 → leaked
Connection 3 → leaked
...
Connection 10 → leaked

Now:

Pool = exhausted

New requests wait or fail.

The fix is:

try {
   // database work
} finally {
   client.release();
}

For simple queries, using:

pool.query(...)

can be preferable because you don't need to manually manage checkout/release.


12. What Happens During a Traffic Spike?

Suppose your application normally has:

2 instances

Then traffic suddenly increases.

The autoscaler might increase the number of instances:

2
 ↓
4
 ↓
6
 ↓
8

But remember:

instances × pool.max

If:

pool.max = 15

then:

2 × 15 = 30
4 × 15 = 60
6 × 15 = 90
8 × 15 = 120

Your database must be capable of handling the resulting connection count.

This is why application autoscaling and database connection pooling cannot be designed independently.


13. What If the Database Is the Bottleneck?

Suppose the Node.js instances are healthy:

CPU = 40%
Memory = 50%

but:

Database CPU = 95%
Query latency = increasing

Adding more Node.js instances isn't necessarily going to help.

You could actually make things worse by generating more database traffic.

At that point, the solution might be:

Slow queries
     ↓
Optimize SQL
     ↓
Indexes
     ↓
Caching
     ↓
Read replicas
     ↓
Database scaling

The bottleneck determines where you scale.


14. So Is There an Algorithm That Decides Everything?

No.

Think of production infrastructure as a collection of cooperating systems.

                 Incoming Request
                        │
                        ▼
                ┌─────────────┐
                │Load Balancer│
                └──────┬──────┘
                       │
             decides where request goes
                       │
          ┌────────────┼────────────┐
          ▼            ▼            ▼
       Node.js      Node.js      Node.js
       Instance     Instance     Instance
          │            │            │
          ▼            ▼            ▼
        Pool         Pool         Pool
          │            │            │
          └────────────┼────────────┘
                       ▼
                    Database

And alongside this:

Metrics
   │
   ▼
Autoscaler
   │
   ▼
Number of instances

Different components have different responsibilities.


15. Who Decides What?

DecisionResponsible component/person
1. Which instance receives a request?Load balancer
2. How many instances should run?Autoscaler
3. How many DB connections an instance can use?Connection pool configuration
4. What should pool.max be?Engineering + capacity planning
5. How many DB connections are available?Database configuration/capacity
6. Whether DB needs scaling?Engineering + monitoring
7. Whether a query needs optimization?Developers/DB engineers
8. Whether caching is needed?Architecture/engineering

This is the key takeaway:

Automation handles operational decisions, but engineers define the constraints and policies that automation operates within.


16. The Mental Model

When designing a Node.js backend, think in this order:

Step 1 — Measure the application

How much traffic can one instance handle while meeting your latency target?

1 instance
→ 500 requests/sec
→ p95 < 200ms

Step 2 — Determine required capacity

If you need 1,500 requests/sec:

1500 / 500
≈ 3 instances

Then add appropriate headroom and define your autoscaling range.

Step 3 — Determine the database connection budget

For example:

DB max connections = 200
Reserved            = 50

Application budget  = 150

Step 4 — Account for maximum instances

If maximum instances = 10:

150 / 10
= 15 connections per instance

Step 5 — Load test

Don't assume the calculation is perfect.

Measure:

CPU
Memory
Request throughput
p95/p99 latency
DB latency
Pool utilization
Connection wait time
Error rate

Step 6 — Continuously monitor

Production systems change.

Traffic changes.

Query patterns change.

Database capacity changes.

Instance sizes change.

So pool and scaling configuration should be revisited based on real measurements.


Final Takeaway

Connection pooling isn't just:

max: 20

It's part of a much bigger system.

The real relationship is:

Traffic
   ↓
Load Balancer
   ↓
Application Instances
   ↓
Connection Pools
   ↓
Database

And the critical relationship is:

Total possible DB connections  = Maximum application instances × Pool max per instance

Note:

The autoscaler manages application instance count.

The load balancer distributes requests.

The connection pool manages reusable database connections.

The database imposes connection and resource limits.

And engineers define the configuration, constraints, and capacity strategy.

Once you understand these relationships, connection pooling stops being a Node.js configuration detail and becomes a system-design problem.

Sunday, July 5, 2020

Webbooks introduction & Implementation

Webhook 

Webhooks are also sometimes referred to as “Reverse APIs”. In APIs, the client-side application calls (consumes) the server-side application. Whereas, in case of web hooks it is the server-side that calls (consumes) the web hook (the end-point URL provided by the client-side application), i.e. it is the server-side application that calls the client-side application.

Webhooks operate on the concept of “event reaction” (don’t call me, I’ll call you if I have something new), and thus avoids the need for constant polling of the server-side application by the client-side application. Thus, rather than the client-side application constantly polling the server-side application to check for new events, the server-side application calls the client-side application (by invoking a client provided webhook URL) anytime the server-side has something new to report to the client.

This is the core concept of the Webhook.

----------------------------------------------------------------------------------------------------------------

What WebHooks are used for

Monday, July 30, 2018

Android Services

Android Services Overview

Android applications are made up of at least one of the following four primary components: ActivitiesBroadcast ReceiversContent Providers, and Services.
The primary mechanism for background work in Android is the service. An Android service is a component that is designed to do some work without a user interface. A service might download a file, play music, or apply a filter to an image. Services can also be used for interprocess communication (IPC) between Android applications. For example one Android app might use the music player service that is from another app or an app might expose data (such as a person's contact information) to other apps via a service.
Services, and their ability to perform background work, are crucial to providing a smooth and fluid user interface. All Android applications have a main thread (also known as a UI thread) on which the Activities are run. To keep the device responsive, Android must be able to update the user interface at the rate of 60 frames per second. If an Android app performs too much work on the main thread, then Android will drop frames, which in turn causes the UI to appear jerky (also sometimes referred to as janky). This means that any work performed on the UI thread should complete in the time span between two frames, approximately 16 milliseconds (1 second every 60 frames).


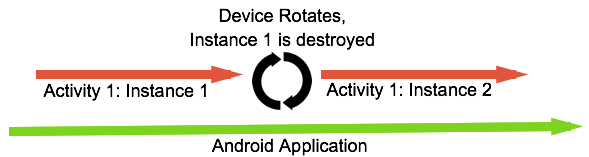
To address this concern, a developer may use threads in an Activity to perform some work that would block the UI. However, this could cause problems. It is very possible that Android will destroy and recreate the multiple instances of the Activity. However, Android will not automatically destroy the threads, which could result in memory leaks. A prime example of this is when the device is rotated– Android will try to destroy the instance of the Activity and then recreate a new one:

When device rotates, instance 1 is destroyed and instance 2 is created


Background work can be broken down into two broad classifications:

  1. Long Running Task – This is work that is ongoing until explicitly stopped. An example of a long running task is an app that streams music or that must monitor data collected from a sensor. These tasks must run even though the application has no visible user interface.
  2. Periodic Tasks – (sometimes referred to as a job) A periodic task is one that is of relatively short in duration (several seconds) and is run on a schedule (i.e. once a day for a week or perhaps just once in the next 60 seconds). An example of this is downloading a file from the internet or generating a thumbnail for an image.


There are four different types of Android services:
  • Bound Service – bound service is a service that has some other component (typically an Activity) bound to it. A bound service provides an interface that allows the bound component and the service to interact with each other. Once there are no more clients bound to the service, Android will shut the service down.

  • Intent Service An IntentService is a specialized subclass of the Service class that simplifies service creation and usage. An IntentService is meant to handle individual autonomous calls. Unlike a service, which can concurrently handle multiple calls, an IntentService is more like a work queue processor – work is queued up and an IntentService processes each job one at a time on a single worker thread. Typically, anIntentService is not bound to an Activity or a Fragment.

  • Started Service – A started service is a service that has been started by some other Android component (such as an Activity) and is run continously in the background until something explicitly tells the service to stop. Unlike a bound service, a started service does not have any clients directly bound to it. For this reason, it is important to design started services so that they may be gracefully restarted as necessary.
  • Hybrid Service – A hybrid service is a service that has the characteristics of a started service and a bound service. A hybrid service can be started by when a component binds to it or it may be started by some event. A client component may or may not be bound to the hybrid service. A hybrid service will keep running until it is explicitly told to stop, or until there are no more clients bound to it.

Wednesday, May 30, 2018

Fetching Location using GPS, Network provider in Android

Overview


One of the unique features of mobile applications is location awareness. Mobile users take their devices with them everywhere, and adding location awareness to your app offers users a more contextual experience. The location APIs available in Google Play services facilitate adding location awareness to your app with automated location tracking, geofencing, and activity recognition.

Earlier getting the location with the couple of API is simple but getting the accurate location We will be using Fused Location API that combines signals from GPSWi-Fi, and cell networks, as well as accelerometergyroscopemagnetometer and other sensors to provide more accurate results.


GPS and network providers are two different ways to get Android device location (latitude and longitude). GPS and network location providers have got their own advantages and we may have to use both in sync. In in-door situations GPS may not provide the location quickly and network location provider is quick. Network location provider uses our mobile connectivity provider and will give the nearest tower location. GPS gives the exact location of where we are standing.


Location Permissions

There are two permissions available to request location. The accuracy of the location is determined by the kind of permission requested and priority level.
  • ACCESS_COARSE_LOCATION: Gives location approximately equivalent to a city block.
  • ACCESS_FINE_LOCATION: Gives precise location, sometimes in few meters or feet when combined with High Priority accuracy.

Request this permission with the uses-permission element in your app manifest, as the following code snippet shows:
<manifest ... >
    <uses-permission android:name="android.permission.ACCESS_FINE_LOCATION" />
   <uses-permission android:name="android.permission. ACCESS_COARSE_LOCATION" />
   <uses-permission android:name="android.permission.INTERNET" />
</manifest>

We need to implement LocationListener and make it a service class by extending Android Service API. Then use the Android’s LocationManager API to get the latitude and longitude location. Nothing much to discuss, lets jump into the code.

public class GPSTracker extends Service implements LocationListener {
    private final Context mContext;
// flag for GPS status // flag for network status // flag for GPS status Location location; // location
// The minimum distance to change Updates in meters
// The minimum time between updates in milliseconds
// Declaring a Location Manager
OnCancel onCancel; public GPSTracker(Context context,OnCancel onCancel) {
this.mContext = context;
this.onCancel=onCancel;
getLocation();
}
public interface OnCancel{
public void onCancel(Context context);
} public Location getLocation() {
try {
locationManager = (LocationManager) mContext
.getSystemService(LOCATION_SERVICE); // getting GPS status
.isProviderEnabled(LocationManager.GPS_PROVIDER); // getting network status
.isProviderEnabled(LocationManager.NETWORK_PROVIDER); if (!isGPSEnabled && !isNetworkEnabled) {
// no network provider is enabled
this.canGetLocation = true;
// First get location from Network Provider
locationManager.requestLocationUpdates(
LocationManager.NETWORK_PROVIDER,
MIN_TIME_BW_UPDATES,
MIN_DISTANCE_CHANGE_FOR_UPDATES, this);
Log.d("Network", "Network");
if (locationManager != null) {
location = locationManager
.getLastKnownLocation(LocationManager.NETWORK_PROVIDER);
if (location != null) {
latitude = location.getLatitude();
longitude = location.getLongitude();
}
}
}
// if GPS Enabled get lat/long using GPS Services
if (location == null) {
locationManager.requestLocationUpdates(
LocationManager.GPS_PROVIDER,
MIN_TIME_BW_UPDATES,
MIN_DISTANCE_CHANGE_FOR_UPDATES, this);
Log.d("GPS Enabled", "GPS Enabled");
if (locationManager != null) {
location = locationManager
.getLastKnownLocation(LocationManager.GPS_PROVIDER);
if (location != null) {
latitude = location.getLatitude();
longitude = location.getLongitude();
}
}
}
}
} } catch (Exception e) {
e.printStackTrace();
} return location;
} /** * Stop using GPS listener
if(locationManager != null){
locationManager.removeUpdates(GPSTracker.this);
}
} /** * Function to get latitude
if(location != null){
latitude = location.getLatitude();
} // return latitude
} /** * Function to get longitude
if(location != null){
longitude = location.getLongitude();
} // return longitude
} /** * Function to check GPS/wifi enabled *
return this.canGetLocation;
} /**
AlertDialog.Builder alertDialog = new AlertDialog.Builder(mContext); // Setting Dialog Title // Setting Dialog Message
alertDialog.setCancelable(false);
// On pressing Settings button
public void onClick(DialogInterface dialog,int which) {
Intent intent = new Intent(Settings.ACTION_LOCATION_SOURCE_SETTINGS);
mContext.startActivity(intent);
}
}); // on pressing cancel button
public void onClick(DialogInterface dialog, int which) { dialog.cancel();
onCancel.onCancel(mContext);
}
}); // Showing Alert Message
} @Override
public void onLocationChanged(Location location) {
} @Override
public void onProviderDisabled(String provider) {
} @Override
public void onProviderEnabled(String provider) {
} @Override
public void onStatusChanged(String provider, int status, Bundle extras) {
} @Override
public IBinder onBind(Intent arg0) {
return null;
} }
boolean isGPSEnabled = false;
boolean isNetworkEnabled = false;
boolean canGetLocation = false;
 double latitude; 
// latitude    
double longitude; 
// longitude
private static final long MIN_DISTANCE_CHANGE_FOR_UPDATES = 10; 
// 10 meters
private static final long MIN_TIME_BW_UPDATES = 1000 * 60 * 1; 
// 1 minute
protected LocationManager locationManager;
isGPSEnabled = locationManager
isNetworkEnabled = locationManager
} else {
if (isNetworkEnabled) {
if (isGPSEnabled) {
* Calling this function will stop using GPS in your app     
* */    public void stopUsingGPS(){
* */    
public double getLatitude(){
return latitude;
* */    
public double getLongitude(){
return longitude;
 @return boolean     
* */    
public boolean canGetLocation() {
* Function to show settings alert dialog     
* On pressing Settings button will lauch Settings Options    
 * */    
public void showSettingsAlert(){
alertDialog.setTitle("GPS is settings");
alertDialog.setMessage("GPS is not enabled. Do you want to go to settings menu?");
alertDialog.setPositiveButton("Settings", new DialogInterface.OnClickListener() {
alertDialog.setNegativeButton("Cancel", new DialogInterface.OnClickListener() {
alertDialog.show();

Use this code to get the Location in any Activity;
boolean isGPSSetings = false;
void gpsTrackerCode(){
gps = new GPSTracker(YourActivity.this, new GPSTracker.OnCancel() {
@Override
public void onCancel(Context context) {

}
});
if(gps.canGetLocation()){
isGPSSetings = false;
double latitude = gps.getLatitude();
double longitude = gps.getLongitude();
if (latitude==0&&longitude==0){
showProgressDialog();
new Handler().postDelayed(new Runnable() {
@Override
public void run() {
gpsTrackerCode();
}
},200);
return;
}
hideProgressDialog();
Location loc=new Location("");
loc.setLatitude(latitude);
loc.setLongitude(longitude);
PrefHelper.getInstance(WheatherActivity.this).setWeatherLocation(loc);
getSupportFragmentManager().beginTransaction()
.add(R.id.container, new WeatherFragment())
.commitAllowingStateLoss();
}else{
new Handler().postDelayed(new Runnable() {
@Override
public void run() {
gps.showSettingsAlert();
isGPSSetings = true;
}
},500);
}
}


Sunday, May 27, 2018

Working With Recyclerview in Android.

Overview :-


RecyclerView was created as a ListView improvement, so yes, you can create an attached list with ListView control.The RecyclerView class supports the display of a collection of data.

It is a modernized version of the ListView and the GridView classes provided by the Android framework. Recycler view addresses several issues that the existing widgets have. It enforced a programming style that results in good performance. It also comes with default animations for removing and adding elements.
RecyclerView allow to use different layout managers for positioning items.
Recycler view uses a ViewHolder to store references to the views for one entry in the recycler view. A ViewHolder class is a static inner class in your adapter which holds references to the relevant views. With these references your code can avoid the time-consuming findViewById() method to update the widgets with new data. but using RecyclerView is easier as it:

Reuses cells while scrolling up/down - this is possible with implementing View Holder in the listView adapter, but it was an optional thing, while in the RecycleView it's the default way of writing adapter.

Decouples list from its container - so you can put list items easily at run time in the different containers (linearLayout, gridLayout) with setting LayoutManager.


Example:
mRecyclerView = (RecyclerView) findViewById(R.id.my_recycler_view);
mRecyclerView.setLayoutManager(new LinearLayoutManager(this));
//or
mRecyclerView.setLayoutManager(new GridLayoutManager(this, 2));


Animates common list actions - Animations are decoupled and delegated to ItemAnimator.
There is more about RecyclerView, but I think these points are the main ones.


So, to conclude, RecyclerView is a more flexible control for handling "list data" that follows patterns of delegation of concerns and leaves for itself only one task - recycling items.


The RecyclerView widget is a more advanced and flexible version of ListView.
In the RecyclerView model, several different components work together to display your data. The overall container for your user interface is a RecyclerView object that you add to your layout. The RecyclerView fills itself with views provided by a layout manager that you provide. You can use one of our standard layout managers (such as LinearLayoutManager or GridLayoutManager), or implement your own.
The views in the list are represented by view holder objects. These objects are instances of a class you define by extending RecyclerView.ViewHolder. Each view holder is in charge of displaying a single item with a view. For example, if your list shows music collection, each view holder might represent a single album. The RecyclerView creates only as many view holders as are needed to display the on-screen portion of the dynamic content, plus a few extra. As the user scrolls through the list, the RecyclerView takes the off-screen views and rebinds them to the data which is scrolling onto the screen.
The view holder objects are managed by an adapter, which you create by extending RecyclerView.Adapter. The adapter creates view holders as needed. The adapter also binds the view holders to their data. It does this by assigning the view holder to a position, and calling the adapter's onBindViewHolder() method. That method uses the view holder's position to determine what the contents should be, based on its list position.

Add the support library

To access the RecyclerView widget, you need to add the v7 Support Libraries to your project as follows:
  1. Open the build.gradle file for your app module.
  1. Add the support library to the dependencies section.

  1. dependencies {     implementation 'com.android.support:recyclerview-v7:27.1.1' }

Add RecyclerView to your layout

Now you can add the RecyclerView to your layout file. For example, the following layout uses RecyclerViewas the only view for the whole layout:
<?xml version="1.0" encoding="utf-8"?> <!-- A RecyclerView with some commonly used attributes --> <android.support.v7.widget.RecyclerView     android:id="@+id/my_recycler_view"     android:scrollbars="vertical"     android:layout_width="match_parent"     android:layout_height="match_parent"/>
Once you have added a RecyclerView widget to your layout, obtain a handle to the object, connect it to a layout manager, and attach an adapter for the data to be displayed:

JAVA


public class MyActivity extends Activity {
    private RecyclerView mRecyclerView;
    private YourAdapter mAdapter;
    private RecyclerView.LayoutManager mLayoutManager;

    @Override
    protected void onCreate(Bundle savedInstanceState) {
        super.onCreate(savedInstanceState);
        setContentView(R.layout.my_activity);
        mRecyclerView = (RecyclerView) findViewById(R.id.my_recycler_view);

        // use this setting to improve performance if you know that changes
        // in content do not change the layout size of the RecyclerView
        mRecyclerView.setHasFixedSize(true);

        // use a linear layout manager
        mLayoutManager = new LinearLayoutManager(this);
        mRecyclerView.setLayoutManager(mLayoutManager);

        // specify an adapter (see also next example)
        mAdapter = new YourAdapter(myDataset);
        mRecyclerView.setAdapter(mAdapter);
    }
    // ...
}

Add a list adapter

To feed all your data to the list, you must extend the RecyclerView.Adapter class. This object creates views for items, and replaces the content of some of the views with new data items when the original item is no longer visible.
The following code example shows a simple implementation for a data set that consists of an array of strings displayed using TextView widgets:

JAVA


public class YourAdapter extends RecyclerView.Adapter<YourAdapter.ViewHolder> {    private String[] mDataset;      // you provide access to all the views for a data item in a view holder     public static class ViewHolder extends RecyclerView.ViewHolder {      
        public TextView mTextView;
        public ViewHolder(TextView v) {
            super(v);
            mTextView = v;
        }
    }

    public YourAdapter(String[] myDataset) {
        mDataset = myDataset;
    }

    // Create new views (invoked by the layout manager)
    @Override
    public YourAdapter.ViewHolder onCreateViewHolder(ViewGroup parent,
                                                   int viewType) {
        // create a new view
        TextView v = (TextView) LayoutInflater.from(parent.getContext())
                .inflate(R.layout.my_text_view, parent, false);
        ...
        ViewHolder vh = new ViewHolder(v);
        return vh;
    }

    // Replace the contents of a view (invoked by the layout manager)
    @Override
    public void onBindViewHolder(ViewHolder holder, int position) {
      
        holder.mTextView.setText(mDataset[position]);

    }

    // Return the size of your dataset (invoked by the layout manager)
    @Override
    public int getItemCount() {
        return mDataset.length;
    }
}
The layout manager calls the adapter's onCreateViewHolder() method. That method needs to construct a RecyclerView.ViewHolder and set the view it uses to display its contents. The type of the ViewHolder must match the type declared in the Adapter class signature. Typically, it would set the view by inflating an XML layout file. Because the view holder is not yet assigned to any particular data, the method does not actually set the view's contents.
The layout manager then binds the view holder to its data. It does this by calling the adapter's onBindViewHolder() method, and passing the view holder's position in the RecyclerView. The onBindViewHolder() method needs to fetch the appropriate data, and use it to fill in the view holder's layout. For example, if the RecyclerView is displaying a list of names, the method might find the appropriate name in the list, and fill in the view holder's TextView widget.
If the list needs an update, call a notification method on the RecyclerView.Adapter object, such asnotifyItemChanged(). The layout manager then rebinds any affected view holders, allowing their data to be updated.

Modifying the layout

The RecyclerView uses a layout manager to position the individual items on the screen and determine when to reuse item views that are no longer visible to the user. To reuse (or recycle) a view, a layout manager may ask the adapter to replace the contents of the view with a different element from the dataset. Recycling views in this manner improves performance by avoiding the creation of unnecessary views or performing expensive findViewById() lookups. The Android Support Library includes three standard layout managers, each of which offers many customization options:
  • LinearLayoutManager arranges the items in a one-dimensional list. Using a RecyclerView with LinearLayoutManager provides functionality like the older ListView layout.
  • GridLayoutManager arranges the items in a two-dimensional grid, like the squares on a checkerboard. Using a RecyclerView with GridLayoutManager provides functionality like the older GridView layout.
  • StaggeredGridLayoutManager arranges the items in a two-dimensional grid, with each column slightly offset from the one before, like the stars in an American flag.

If none of these layout managers suits your needs, you can create your own by extending the RecyclerView.LayoutManager abstract class.

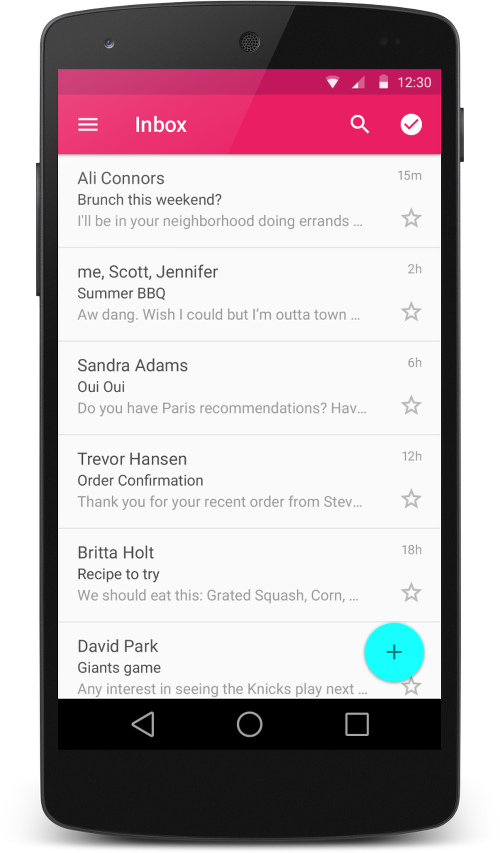
Figure 1. A list using RecyclerView
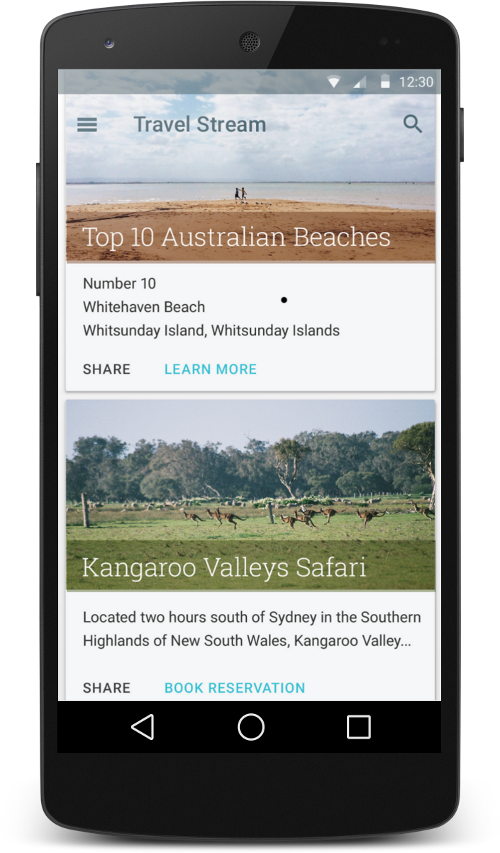
A list With CardView

Connection pooling in depth

  Who Decides How Many Node.js Instances and Database Connections You Need? When we learn Node.js connection pooling, we often see something...